TinglyTube Notices

Showing 1 to 5 of 6 notices.
Creating, Managing, and Navigating 🧭 Playlists 📺🗒️

We're pretty excited about the new Playlists feature, and we hope you are too, but as with any new feature, there is a bit of a 'learning curve' to using it, and as such, we have created this help article to guide you through everything there is to know about them!

But before we get started, you might be curious as to what exactly a playlist is.

Playlists allow you to create organized 'collections' or 'groups' of TinglyTube videos that you can assemble and organize to your liking, complete with their own title and description. Below is an example of a playlist by JJ15ASMR that contains all of his TinglyTube Exclusive videos.


Now that you know what a playlist is, let's get into how to create, manage, and navigate them!

Creating a Playlist


You can create a playlist in one of two different ways, either from the dedicated "Create a Playlist" page or from the watch page of any video on TinglyTube.

From the "Create a Playlist" page:

1. Go to the "Create a Playlist" page by pressing your username at the top-right corner of the site, select “My Playlists” from the dropdown menu, and then to the right of the "Playlists" page heading, click/tap on "Create a Playlist".

(On PC)


(On Mobile)


2. Once on the create page, you can give your playlist a title (maximum of 120 characters), description (optional with a maximum of 255 characters), and privacy setting.


3. You can then add videos to your playlist by pasting the full URL (video shortlinks are not accepted) into the "Add Videos" input field, adding more as needed by pressing the "Add" button to the right of the input (you can also remove unneeded ones by pressing the "Remove" button).


4. Press the "Create" button and you'll be taken to your newly created playlist!

From the Video Watch Page:

1. Under any video on TinglyTube, press the "Add" button and a box with two tabs will pop up, the first will show any playlists of yours with their associated details, and the second will allow you to create a playlist that will have the current video added to it once created.

(On PC)


(On Mobile)


2. You can of course select an existing playlist of yours to add the current video to it, but we will instead use the second tab to create our playlist in the same steps that we would when using the dedicated create page.


3. After giving your playlist a title, description, and privacy setting of your choice, press the "Create" button.

Viewing and Managing your Playlists

Once you've created your first playlist(s), you can easily view and manage them by going to the "My Playlists" part of your profile as described before.

Your playlists will also be displayed on your profile depending on your individual playlist's preferences and your global user preference on whether or not you want your playlists displayed on your profile at all.

You can edit this preference by going to the "User Preferences" page by pressing your username 
at the top-right corner of the site as described before, selecting "Edit Profile", and from there selecting the "Preferences" tab next to the "Personal Tab".

(On PC)


(On Mobile - you will need to tap "Personal" and then select "Preferences" from the dropdown)


Under each playlist will be two icons, the first will allow you to edit your playlist, and the second will allow you to delete your playlist.


Clicking/tapping on a playlist will take you to its view page where you can view all of the videos in it, in which you can click/tap the "X" icon under any of them to remove that video from your playlist.


One cool feature that you may have seen on other platforms before is the "Play All" button which is situated to the right of the playlist's title.


Pressing it will take you to the first video in the playlist and once it is finished, the next video in the playlist will be played automatically, and it will continue until the end of the playlist has been reached.

How to Edit a Playlist

You can easily edit the details of an existing playlist and the videos in it by following the below steps:

1. As described before, press on the "Edit" icon under the playlist you'd like to edit to be taken to the edit page.

2. On the edit page you can edit the title, description, and privacy setting of the playlist as well as view a table of the videos in your playlist.


3. From the table of videos in your playlist, you can remove them in bulk by checking the "REMOVE" checkbox next to the video that you'd like to have removed, and you can also change which video will be shown as the thumbnail of your playlist by checking the radio circle next to that video.

From the same table, you can also dynamically search for and filter the videos that are in your playlist.

4. Press the "Save" button to save your changes.

Hidden Playlists

Hidden Playlists are playlists with no videos in them, this might happen by you removing all of the videos from the playlist, or the videos within the playlist being deleted by their uploader. So in order to provide a good user experience, we hide playlists with no videos in them, however, they are not removed or deleted. You can easily unhide a playlist by just adding some videos to it.

If you have any Hidden Playlists you will see a badge next to the "Hidden Playlists" button  (next to the "Create a Playlist" button) with the total number of them. To view them, press it, and a box will pop up displaying them.

(On PC)


(On Mobile)


To unhide a playlist, just press the "Edit" icon under it to be taken to the edit page so you can add some videos to it. If you'd like to delete it instead, just press the "Delete" icon and confirm the deletion.

And that's pretty much all there is to know about Playlists! 😊 We hope it was helpful, but if you still need help, or have any questions or feedback for us about playlists or anything else, please feel free to let us know via our Support/Feedback form.

27   1 year ago
How to Video Chat using TinglyTube Messenger

If you've used Zoom or similar platforms before, especially during the COVID-19 pandemic in 2020, the Messenger video chat interface should come pretty naturally to you, but if you need any help navigating the various features, this help article is for you!

How to Video Chat with Someone

In order to video chat with another user on TinglyTube, you and them will both need to be using PCs (as video chat is only supported on PC at this time, mobile support is coming soon) and they'll also need to be online or idle (otherwise you won't be able to send them a video chat request).

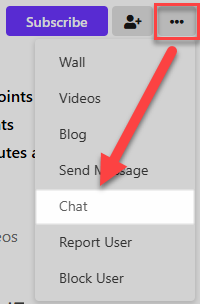
Click on the "Chat" tab on the Messenger bar which will launch your 'buddylist', this list displays all of your friends that are online currently or idle, then locate the user that you want to video chat with and click on them.


But if you're not friends with them (hence they won't show up in your buddylist) then go to their profile, once there click the speech bubble icon as shown below.


When you do either of these, a chat window will then pop up to where you'll see their username at the top, and 3 (three) icons to the far right of their name, the first icon will be a  icon, click it!


This will send the user a video chat request to which they can accept or deny (by not accepting it), while that happens, the video chat interface will open in a window on top of your current browser window, here you can enter the name you'd like to be identified as in the call, this can be your username or any other name you'd like to use, you can also configure your camera/microphone from this screen as well, as well as see whether or not your microphone is working properly (there should be a green dot at the bottom of the box on your screen).


Navigating the Video Chat Interface

Once you've entered your name, and the user you've called has hopefully joined, you'll see a dark toolbar hovering at the bottom of the window, let's go over what each button does:


  1. Mute - Click this button to mute or unmute your microphone. You can click the small arrow pointing up to the top right of it to configure your microphone's settings.
  2. Video - Click this button to turn your camera/video feed on or off. You can click the small arrow pointing up to the top right of it to configure your camera's settings.
  3. Screenshare - Click this button to share your computer screen, this can be useful for having a movie night with your TT bestie (Salò anyone?) or sharing some spicy memes.
  4. Open Chat - Click this button to open/show the video chat's text chat (Yep, there's a separate chat within the video chat interface! coolio!)
  5. Raise Hand - Click this button to raise/un-raise your hand, there's probably not much of a use for this in video calls between friends, but because video chatting is powered by a separate service (Jitsi Meet) we can't remove it.
  6. View Participants - Click this button to see a list of all of the participants within the video call.
  7. Toggle Tile View - Click this button to toggle a tile view of everyone in the video call.
  8. More Options - Click this button to access a menu of a variety of other settings and options.
  9. End Call - This one's pretty self-explanatory :)
Phew, that's a lot of buttons! But the really cool thing is that because Jitsi Meet is meant to be an alternative to Zoom, you can also invite others to your video call as well (they can even use their phone to dial in and enter an access code!) all of this can be done from the more options menu and the box that pops up when you first enter the video call.

Wrapping it All Up

We hope that this help article has helped you become at master a video chatting/calling with Messenger (as well as Jitsi Meet), but if you still need help with anything, don't hesitate to let us know via our Support/Feedback form, we love hearing from, listening to, and helping you! You can also leave a comment below and we'll back to you as soon as we can :)

27   2 years ago
How to Use TinglyTube Messenger on Mobile 📱

Confused or lost on how to use the new TinglyTube Messenger? Don’t worry! We’ll teach you how to use it and all of its features on mobile, so let's get started!

How to Find and Navigate Messenger

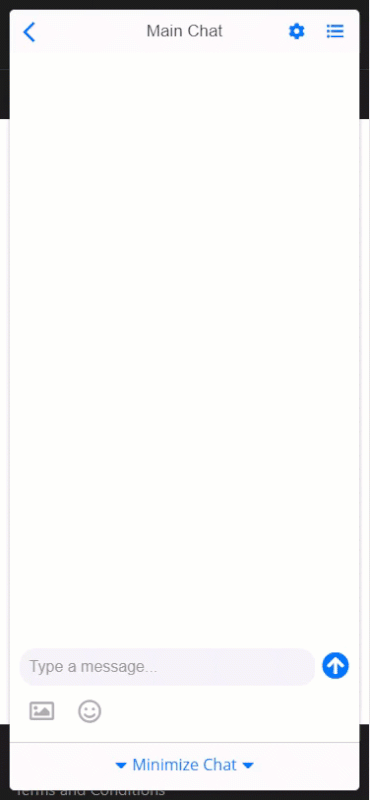
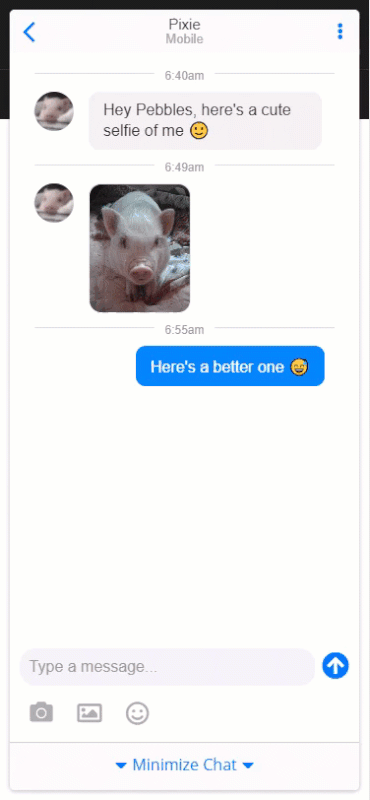
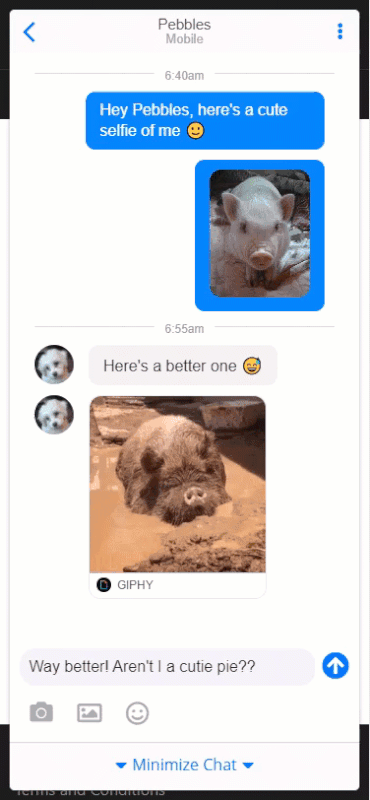
You can find Messenger as a floating purple bubble with a chat icon on it at the bottom of your screen, tapping on it launches the mobile Messenger interface.

Once opened, you’ll automatically be on the “Chats” tab, which shows your most recent chat conversations if you have any, tap on a chat to open it.


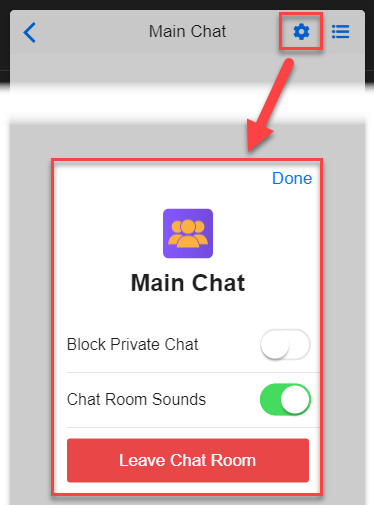
At the top of the interface, you’ll see a hamburger menu (the icon with three lines) on the top left, and a paper-plan icon on the top right, tap the hamburger menu to access various chat related settings:

  • Hide Mobile Chat Tab – Slide or tap this to hide the mobile chat bubble at the bottom of your screen (Note: To show the mobile chat bubble again, you must delete the “ac_hide_mobile” cookie in your browser, we plan to make this easier soon).
  • Chat Sounds – Slide or tap this to disable/enable chat sounds (the “Doink” sound you hear when you receive a message).
  • Disable Avatars – Slide or tap this to disable/enable the showing of profile pictures in chat and only show usernames.
  • Unblock Users – Select a blocked user from the list and tap “Done” at the top of the Settings box to unblock them.
Tap the paper-plane icon to search for a user to chat with and tap on them to open a chat with them (Note: You can only search for a user that you’ve previously chatted with).

After the “Chats” tab, there is an “Online” and “Chatrooms” tab, tap the “Online” tab to open your Buddylist, it shows which of your friends are online and available to chat, just click on their name to start chatting with them.

Tapping the “Chatrooms” tab will show all of the available chatrooms you can join, which are group chats where any online TinglyTube user can participate, if you’ve joined any chatrooms, you’ll see them first at the top under the blue “JOINED CHAT ROOMS” header, you're automatically joined to the "Main Chat" chatroom so it will display here.

How to Chat with Others Privately

You already know how to start chatting with your friends by tapping on them in your Buddylist, but what if you want to chat with someone who’s not your friend? It’s as easy as with the old messaging system.

Just go to their profile, tap the button with the three dots, select “Chat” from the dropdown list, and a chat will pop up and you can start chatting with them 😊.


When chatting with others, you can tap the vertical three-dots in the top right of the chat header to access the following options:
  • Visit Profile – Tapping this will take you to the user’s profile on TinglyTube.
  • Clear Conversation – Tapping this will clear the chat’s history on your end but doesn’t actually delete anything (this is so that chats and messages can still be reported if they violate our terms).
  • Report Spam/Abuse –Tapping this will report the user you’re chatting with and their messages to our Trust and Safety team for review, users that send messages that violate our Terms and Conditions and/or Community Standards will either receive a warning or account suspension based on the severity of their violation.
  • Block User – Tapping this will block the user that you’re chatting with and prevent them from chatting with you again. You can unblock them at any time by going to the Settings menu (as described before).
How to Chat with Others in Chatrooms

In Chatrooms, you can chat and send messages the same way you can in private, one-on-one chats, the only difference is that any TinglyTube user can participate in them.

In order to keep all chatrooms clean and orderly, messages are limited to 150 characters (letters and numbers), you can only send 3 messages within a 10-second time span, and chat history only lasts for 1 week (7 days).

When chatting in chatrooms, you can tap the gear icon to access various chatroom related settings:


  • Block Private Chat – Tap or slide this to prevent others in the chatroom from being able to chat with you privately by tapping on your name in the userlist (Note: This doesn’t stop them from starting a private chat with you via your profile or their buddylist).
  • Chat Room Sounds – Tap or slide this to disable/enable chatroom sounds (the “Doink” sound you hear when a new message is received in the chatroom).
  • Leave Chat Room – Tap this button to leave that particular chatroom, this won’t delete any of your messages and you can join back at any time via the “Chat Rooms” tab and tapping on the Chatroom you want to rejoin.
You can tap the list icon next to the gear icon to display a list of all of the users in that chatroom, tap on a user in the list to Private Message (This will be greyed out if they have Private Chats blocked), Block, or Report them.


How to Attach Images/Files, GIFs, and Emojis to Your Messages

You can add some pizazz and spiff to your messages by attaching Images/Files (up to 8MB), GIFs, and Emojis by following the steps below for each type:

To Attach Images/Files -
  1. Tap on the camera icon under the message input, depending on your device, you may be prompted to either choose a file from your device or take a photo or video.
  2. Select the image/file you’d like to attach and it’ll automatically upload and send itself.

(Note: The above demonstration was emulated using a PC with the file selection part cut out, on a real mobile device you'd have to choose an image/file from your device).

To Attach GIFs -
  1. Tap the picture icon under the message input, this will open up a box where you can search for a GIF on Giphy.
  2. Once you’ve found the perfect GIF to send, tap on it, and it’ll automatically send itself.


To Add Emojis -
  1. Tap on the smiley face icon in the right of the message input, this will open up a box you can scroll and select different tabs to find the emoji(s) you’d like to send.
  2. Tap on the emoji(s) you’d like to add to your message and they’ll automatically be added to the end of your message.


Congratulations! You've successfully learned how to use TinglyTube Messenger! 🎉 So what are you waiting for? Start chatting with others today!

453   2 years ago
How to flag content, users, and comments on TinglyTube.

We aim to make and keep TinglyTube a safe and peaceful community, free of bullying, harassment, and spam. That's why we allow any registered TinglyTube user to flag other users, comments, content, etc. to our staff for 24/7 review.

This help article will walk you through how to flag a variety of content on TinglyTube, now let's get started!

Flagging Users

You can flag other users by going to their TinglyTube profile and tapping the three-dots which will open a dropdown menu where you can select "Report User" and select the reason why you are flagging them and hit the "Submit" button (If they are bullying and/or harassing you, we suggest blocking them as well until we review the flag).


Flagging Comments (Video, Blog, and Wall)

You can flag a variety of comments types (Video, Blog, and Wall) by hovering over the comments and tapping the three-dots, then selecting "Report Spam", don't worry if the comment isn't spam, if it really shouldn't be on TinglyTube, we should be able to see and read that clearly.


Flagging Video Content

You can flag video content by tapping the "Flag" button under the video and then selecting the reason you are flagging the video and then hit the "Submit" button.


Flagging Other Types of Content

At this time, some content, such as blogs and private messages, cannot be reported, in the case you wish to report content which does not have a flag button for it, you can report it to us via our Support/Feedback form (be sure to send it to the "Trust and Safety/Violations" department!).

Before flagging content, users, or comments, please have a look at our Community Standards, which outlines what behavior is not accepted on TinglyTube, users who submit multiple ‘false flags’ (Falsely reporting content on purpose) will have their account suspended.

If you have any questions regarding flagging, contact us via our Support/Feedback form (select ‘Trust and Safety’ as the department) or email us at tns@support.tinglytube.com.

580   3 years ago
How to upload a video to TinglyTube

Hey there and congratulations again on unlocking video uploading!

The aim of this help article is to get you familiar with uploading video(s) to TinglyTube and help you do it right so people want to click on your video and enjoy it.

Rules for video uploads

First, let's start with the rules of uploading video to TinglyTube:

  • Videos must be ASMR or relaxing in nature.
  • Videos must be under 2gb (specifically 2.99gb) in size and in one of the following formats; .mp4.avi.flv, or .mov. We highly recommend uploading your video in .mp4 format as it will be immediately playable after you upload as it won't need to go through the first pass of FFmpeg conversion (an open-source codec library for converting many video formats to .mp4, which is universally playable on all kinds of devices, PC, mobile, gaming console, etc).
  • And all videos must of-course abide by our Terms and Conditions (specifically the acceptable use clause).

Uploading your first video and metadata best practices

Second, let's now show you how to upload your first video and give it the proper metadata:

If you haven't already, please sign-out and back into your TT account, this is so that the video uploading permission change will take effect on your account.

  1. Click the "UPLOAD" button in the top right corner of the menu. On mobile, tap the hamburger menu in the top left corner of the screen and locate the "UPLOAD" option at the bottom of the menu.                                                                                 
  2. You will then be able to choose the video file you would like to upload, you can do this by either using the drag-and-drop function or choose a file from your PC or device via the "Choose File" button.
  3. Once your video file has been attached, you can now start adding the 'metadata' to your video, this means your titles, description, tags, category, and privacy options. All of the metadata fields are mandatory and you should fill them out completely and properly so your video ranks high and possibly even get featured! But please don't add misleading or spammy metadata.
  4. Then hit the "Upload" button and your video will get beamed up to our server and start uploading! As it says on the page, keep the tab open, if you close it you'll have to upload your video again. You can mesmerize yourself with the realtime progress bar in the meantime.
  5. Once your video has successfully uploaded, you've been redirected back to the uploading page and if you uploaded your video in .mp4 format, you should see it live on your profile right away, if not, just wait a couple of minutes! Keep in mind that the processing time depends on how long your video is, longer videos will take longer to process and convert.

Well, we hope this helped you learn how to upload your first video, and if need any help, or have a question regarding video uploading, leave us a comment on this help article or contact us via our Support/Feedback form.

524   3 years ago